Starting a new business venture is an exciting milestone, but choosing the right legal structure can feel overwhelming. For many entrepreneurs, a Limited Liability Partnership (LLP) offers the perfect middle ground. It combines the operational flexibility of a traditional partnership with the robust legal protection of a private limited company.
If you are looking to secure your personal assets while keeping compliance simple, choosing an LLP is a brilliant strategic move. Let’s break down the exact, step-by-step process for llp company registration, making a complex legal journey entirely manageable.
What is an LLP and Why Choose It?
Before diving into the paperwork, it is helpful to understand what makes an LLP so appealing. In a standard partnership, partners are personally liable for the business’s debts. If the business defaults, personal assets like homes and savings are on the line.
An LLP eliminates this risk. It creates a separate legal entity, meaning the business stands on its own two feet. The partners’ liability is strictly limited to their agreed contribution. Furthermore, it offers a perpetual succession model (the business continues to exist even if partners change) and faces fewer rigid compliance burdens than a standard corporation.
Documents Required for LLP Registration
To ensure a seamless registration experience without annoying rejections from the Ministry of Corporate Affairs (MCA), you need to gather your paperwork upfront.
The documents required for llp registration are divided into two distinct categories:
1. Documents of the Partners
- PAN Card / ID Proof: A Permanent Account Number (PAN) card is mandatory for Indian nationals. Foreign nationals must provide an apostilled or notarized passport.
- Address Proof: A recent document (less than two months old) showing the partner’s full name. Acceptable documents include a bank statement, electricity bill, telephone bill, or mobile bill.
- Identity Proof: A valid passport, driver’s license, or Voter ID card.
- Passport-size Photographs: Recent digital photographs of all proposed partners.
2. Documents of the Proposed LLP (Registered Office)
- Proof of Registered Office Address: A recent utility bill (gas, electricity, or telephone bill) for the intended office premises.
- No Objection Certificate (NOC): A written statement from the property owner granting permission to use the premises as the LLP’s registered office.
- Proof of Ownership: A copy of the sale deed or rent agreement for the property.
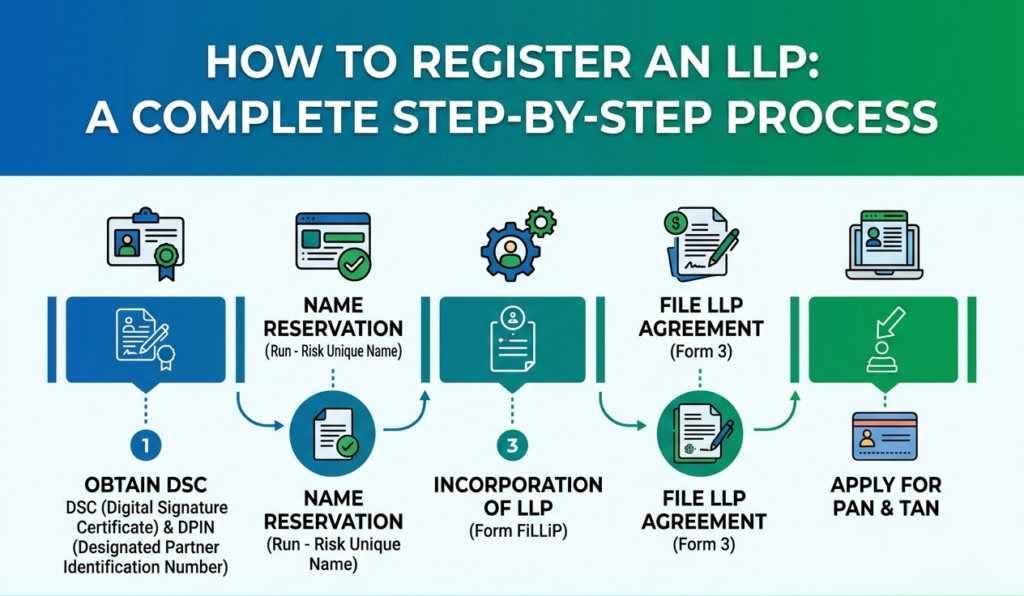
The Step-by-Step LLP Registration Process
With your documents organized, you are ready to initiate the digital incorporation process through the MCA V3 portal.
1. Obtain Digital Signature Certificates (DSC): Step 1: 1-2 Days.
Because the entire registration process is digital, physical signatures won’t cut it. The designated partners must obtain a Class 3 Digital Signature Certificate (DSC) from a certified government authority. This secure digital key is used to electronically sign all online incorporation forms.
2. Apply for Name Approval via RUN-LLP: Step 2: 2-3 Days.
Next, you must reserve a unique identity for your business. Use the “Reserve Unique Name-LLP” (RUN-LLP) web service on the MCA portal. You can propose up to two names in order of preference. Ensure your names are distinctive, reflect your business activities, and do not infringe on existing trademarks or existing company names.
3. Fill Out the FiLLiP Incorporation Form: Step 3: 3-5 Days.
Once your name is officially approved and reserved, it’s time for the heavy lifting. You will fill out the “Form for Incorporation of Limited Liability Partnership” (FiLLiP). This comprehensive digital form integrates applications for the LLP’s incorporation, the allotment of Designated Partner Identification Numbers (DPIN) for partners who don’t have one, and the formal registration of your office address. Attach all your verified partner and office documents here.
4. Receive the Certificate of Incorporation: Step 4: 1-2 Days.
The central registration authority will meticulously review your FiLLiP submission. If everything aligns perfectly with legal requirements, the Registrar of Companies (RoC) will issue your official Certificate of Incorporation. This certificate features your unique Limited Liability Partnership Identification Number (LLPIN) and serves as undisputed legal proof that your business is born.
5. Draft and File the LLP Agreement: Step 5: Within 30 Days of Incorporation.
The final, vital step is executing your LLP Agreement. This foundational document governs the internal operations of your business, outlining the rights, duties, profit-sharing ratios, and capital contributions of every partner. Print this agreement on non-judicial stamp paper (the value depends on your state and capital), have all partners sign it, and file it online via Form 3 on the MCA portal within 30 days of your incorporation date.
Post-Registration Checklist: Ready for Action
Getting your Certificate of Incorporation is a massive win, but you aren’t quite ready to open your doors to clients just yet. Before signing contracts or issuing invoices, make sure to check off these critical final tasks:
- Apply for a Business PAN and TAN: Your LLP is a separate taxpayer. You must apply for a dedicated Permanent Account Number (PAN) and Tax Deduction and Collection Account Number (TAN) in the name of the LLP.
- Open a Corporate Bank Account: Take your Certificate of Incorporation, the stamped LLP Agreement, and the business PAN card to a bank to set up a dedicated current account. Never mix personal and business finances.
- Secure Necessary Tax Registrations: Depending on your business model and projected revenue, apply for Goods and Services Tax (GST) registration, professional tax enrollment, or specific local municipal licenses.
Final Thoughts
The journey of llp company registration might seem highly bureaucratic at first glance, but breaking it down into distinct, systematic phases makes it incredibly straightforward. By gathering the correct documents required for llp registration early and carefully following the online filing steps, you can establish a secure, compliant, and highly credible business entity.
Taking the time to build this solid legal foundation allows you to protect your personal assets and shift your full focus toward what matters most: scaling your vision and growing a successful business.